0
comments

Thursday, August 7, 2014

Parrot Polish!

Press Release

Hi!

Today I have a brand new Indie polish brand to show you! They're called Parrot Polish, named simply after their love for birds! Their polishes are 3 free, and they have a pretty great selection! On to the swatches..

Purple Haze
3 coats
No top coat

This is a pretty purple polish with a subtle teal shine to it! The shine was hard to capture on camera, but it is a gorgeous polish.

Blink!
2 coats
No top coat

Blink! is a dusty pink with a slight purple shimmer to it. Again, its subtle, but its there and it differentiates this polish from any other pink. Super nice for the spring time, can't wait to wear it then!


I took a close up so you can better see the purple shimmer! Its very apparent in the sun.

Essence
1 coat over black
No top coat

My personal favorite of the 3, Essence is a gorgeous topper with pink and purple shimmer in. One coat adds the perfect amount of color! I've also tried it over Blink! and they are basically made for each other. I forgot to take pictures though.. sigh.

Check out Parrot Polish over at www.parrotpolish.com. They have quite the selection of polishes so theres bound to be something for everyone!

Thanks for reading!

1 comments

Sunday, June 15, 2014

Can we talk about Nailtini for a minute?

Hi!

I received my May Ipsy bag recently which contained Nailtini Nail Polish in the color Bloody Mary.

Generally retailing around $12, this isn't a polish that I would normally pick up nowadays due to my unfortunate part time employment at the moment. But.. stay with me here.


This is ONE COAT with NO top coat! I couldn't believe it. It completely covers everything, applied really well, was basically streak free and shined like crazy! 


I decided to pop China Glaze - Fang-tastic on top and Seche Vite on that and voila, easy and colorful manicure!

I must try more Nailtini products in the future.

What is your favorite nail polish brand?

Thanks for reading!


1 comments

Thursday, June 5, 2014

I've got a bottle of nail polish and a microscope.

Hi!

Can I start by telling you.. I am so excited about this post.
About a week ago, my boyfriend purchased a microscope. Its nothing super duper fancy but its nice and its fun to have. So obviously.. we took pictures of nail polish.

First, let me show you the polish we're looking at today: Orly - Aqua Pixel


Aqua Pixel is described by Orly as an Aqua 3D Glitter with a Pixelated Finish. It is essentially a liquid sand polish that dries gritty and sandy, and it also looks gorgeous smoothed out with a top coat. This is already a complex and beautiful polish.


And here it is underneath a microscope!

So weird that it looks way more blue. But honestly, a lot of polishes didn't look like we imagined they would! Also the bottle and swatch pictures are a bit lighter than it looks in real life.

Since this was literally the first polish we looked at, the picture isn't perfect. Probably also because we took it by sticking my camera against the eyepiece like absolute noobs. However, once I can afford to I'd love to get a picture/video taking eyepiece for it so I can take way better pictures of polishes!

I'm thinking I'll make a bit of a series of this, since I think its SO FREAKING COOL.

I honestly think it looks like a blue desert. So crazy! And I've got a bunch more really cool polishes to show you in future posts!

What polish would you want to see under a microscope?

Thanks for reading!


1 comments

Sunday, May 18, 2014

So obsessed with rhinestones!

Hi!

Recently I've found myself wearing rhinestone nail art a lot. Its so easy to do and adds some super simple bling to some of my favorite nail colors.


This was the first manicure I did with them, and I LOVED it! I wore it for nearly a week before I decided to change my polish and the rhinestones didn't budge a bit!
The pink polish is NYC - Lincoln Square Lavender, one of my favorites!


We bought my cat nail caps recently due to us purchasing brand new furniture. He's not a scratcher but we did notice a tiny mark or two just from him jumping off of it, so caps were the solution. I picked blue out so it'd be easy to see if one falls off, and I decided to match with him!

I went for the simple one rhinestone look again. The polish is BP by Nordstrom.. not sure of the name, honestly. It isn't listed on the bottle! Boo..

I'm waiting for some more rhinestones and other nail art things to arrive in the mail, once I have those I've got some more manis in mind!

Are you obsessed with rhinestones like I am?


Also, you may have noticed the change in name! I have moved over from nailsss.blogspot.com to nailesque.blogspot.com . In the future I plan to move to my own domain, but not right away. I'm still making plans. (Also, if you have advice, lay it on me.. lol)
Hopefully you like the changes and, as always..

Thanks for reading!

1 comments

Sunday, March 30, 2014

Jazzy Jubilant <3

Hi! 

Today I have another quick mani showcasing a polish I received as a gift!


Polishes used:

NYC - Sidewalkers
Essie - Jazzy Jubilant


Also bonus model Flapjack. 

Thanks for reading!

Follow my blog with Bloglovin


2
comments

Thursday, March 13, 2014

A Quick Pink Mani (for St. Patty's Day..?) AKA Love, Crazy Love

Hi!

I have a simple pink mani that I did moments ago, that I wanted to share.


Polishes Used:

Pure Ice - Love (Light Pink)
Pure Ice - Crazy Love (Dark Pink)
Kiss Nail Art - Silver Glitter Striping Polish
OPI Top Coat
Two coats of everything except the top coat.

I love that the colors are called Love, and Crazy Love. Also, I totally forgot that it is St. Patty's weekend and I will be sporting bright pink on my nails. Oh well.

This is my first time using the OPI Top Coat, we'll see how it is! It is crazy shiny, I can tell you that now.

Thanks for reading!


1 comments

Sunday, November 17, 2013

Luvocracy - Obsessed!

Hi!

I'm having a little trouble finding the cord to upload pictures from my camera, but I still wanted to post today! I've recently discovered a new website and mobile app - Luvocracy. 

Think of Pinterest - you can view people's collections, see items they recommend, and "trust" them (the same as liking or following them).. but the best part is you can shop through the website! When you are viewing someone's collections and you see something you need to have, you buy it straight from their page and Luvocracy will even search to try and get the best price available for the product!

Its a lot of fun - and you can even earn credit towards your purchases when someone buys through your page!

I don't want to go on and on - check it out for yourself! While you're there, you can hit the "trust" button on my page so you can see what I recommend. I do have a nail polish/nail product specific collection that I plan on updating frequently, so follow me!


Thanks for reading!
9
comments

Saturday, October 26, 2013

Color Club Swatches!

Hi!

This last Christmas (2012) my boyfriend was a genius and put a bunch of Color Club nail polish minis in my stocking! I have tried one or two of them but its October now and I wanted to swatch them finally! I also think the colors he picked are pretty great for the upcoming Fall season as well.

This is my first "swatch" post and my pictures aren't perfect - fair warning ;)

Top pictures are without flash, bottom pictures are with flash.


Dreamin is a pretty medium pink. I really like the color, but it was both a little bit thick and a little bit sheer, which made it a bit difficult to apply.
Shown is 3 coats of Dreamin.


Strawberry Sharbet is a super sparkley pink glitter. I was so excited about this one but was sorely disappointed! I don't know if its just my bottle or what, but this polish was SO thick, it was nearly impossible to apply. I want to try it again with some thinner in it. You can really see on my pointer finger how difficult it was to apply evenly! However,  it is totally wearable by itself and is nice and opaque for a glitter. Anyone else have this problem with this polish?
Shown is 2 coats of Strawberry Sharbet.


Flair is a pretty tomato red. This polish applied much better than the first two! What a relief. Also, if you look at the flash its got a gorgeous orange sheen to it! A really nice polish.
Shown is 2 coats of Flair.


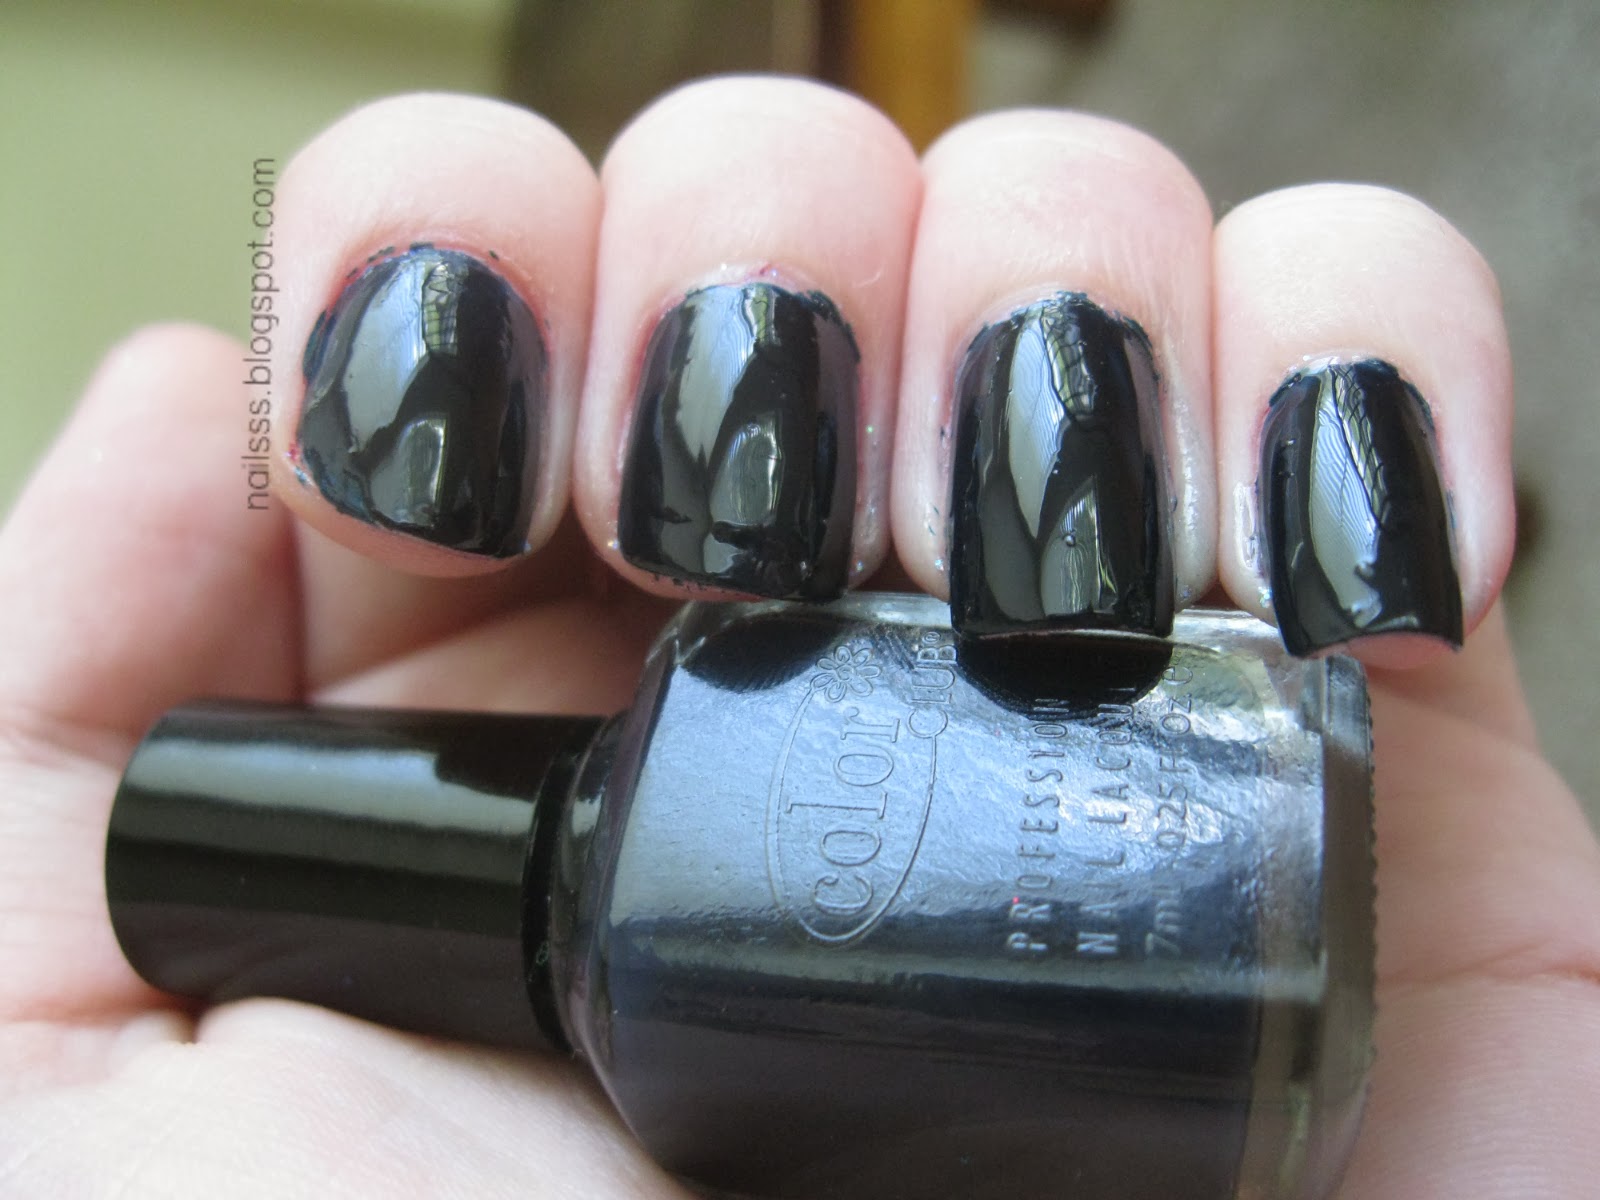
Black-ish is a GORGEOUS bronze-purple-red-brown color. This is perfect for fall, and is my favorite of the bunch. This applies smoothly and is very opaque. You really only need 2 coats of this. I will probably repurchase this in the future in full size!
Shown is 3 coats of Black-ish.


First of all, I am 99% sure this is Blue-Topia, but the label on the bottom was gone before I even got it for Christmas, waaaah! I wish they didn't put their labels on the bottom. This is a dark navy jelly and is honestly very pretty, but I'm not crazy about it. It applies nicely, but its so dark it looks like black most of the time. If it were a shade lighter I'd be absolutely nuts about it! Also, this stains like crazy, be careful!
Shown is 3 coats of Blue-Topia.

These colors are all super unique in my collection, none of them are like anything I have. I might have to try some nail polish thinner on Strawberry Sharbet, but for the fall these will be great to have.

Thanks for reading!
6
comments

Sunday, September 29, 2013

Emerald Shimmer!

Hi!

Today I have a surprising combination for you - at least in my opinion, I didn't expect these two polishes to look so freaking gorgeous together.


And it was even prettier in person!!
I couldn't stop looking at my nails while I wore this. This is a greenish Pure Ice layering polish over a navy Color Club polish. Who thought greenish + navy = gorgeous emerald?

I want to wear this one again. The navy polish (in my opinion) is just way too dark on its own, too near to black. However, I just want to layer everything over it now!

Products Used:

Base Coat - Seche Vite Ridge Filling Base Coat
Color Club - Blue Topia
Pure Ice - Heartbreaker
Top Coat - NYC Grand Central Station

By the way.. I've swatched all the Color Clubs that I have (5 of them) so keep an eye open this week (probably next Sunday) for those.

Thanks for reading!
8
comments

Sunday, September 22, 2013

Easy Peasy Grey with Purple Glitter Manicure

Hi!

For my late night Sunday post this week, I have a pretty and simple manicure with a super colorful glittery polish!


I love grey, it looks good with so many colors and is a nice change from white and black! I could have done more coats of the glitter as well, but I liked the sparkle that just one coat leaves. As you can see, it is a mix of blue, red, purple, and silver sparkles! Super pretty.

Products used:

Base Coat - Sally Hansen Nail Protex Vitamin-Fortified Strengthener
NYC - Sidewalkers (Grey)
NYC - Big City Dazzle (Glitter)
Top Coat - NYC Grand Central Station

Thanks for reading!

6
comments

Wednesday, September 18, 2013

Tiffany Blue Sparkle Gradient

Hi!

I was in a glittery mood, and then this happened..


I'm kinda obsessed with both of these polishes, and wanted to attempt a gradient glitter effect instead of just glitter everywhere. I did 3 layers of the glitter, and made it get denser and denser as it got closer to the cuticle. I love this so much! I want to do this sort of thing again but with a super tiny and opaque glitter instead of a chunkier one like this.

Products used:

Base Coat - Sally Hansen Nail Protex Vitamin-Fortified Strengthener
L'Oreal - Not A Cloud In Sight
Pure Ice - Over You
Top Coat - NYC Grand Central Station

Thanks for reading!

P.S. Have fun with iOS7 today, iPhone users! I'm super excited.

3
comments

Monday, September 16, 2013

Simple Tape "French" Manicure and Planning Ahead

Hi!

I quickly wanted to mention that I want to start a "schedule" to my posts - this is barely a real schedule, but heres what I have in mind:

- I will post at the very minimum one post on Sunday. I have been busier due to my job and Sundays are a good day for me to post and do blog related things.. so this seems like a good fit! These posts will almost always be nail related.
- I will try to do an additional post at some point during the week. I have a sort of regular schedule but sometimes I will have Tuesday off, sometimes it will be Friday, etc. Depending on my life goings on, I will do my best to do an additional post then. Plenty of these will be nail related, but this is when I'm more likely to do a makeup/off topic sort of post.

Thats out the way, now for what you came here for!


This is a simple french manicure using scotch tape to get crisp, defined lines. I always jump at pinks and purples, so I wanted to throw some lesser used colors in! Really easy manicure to do, very cool effect! 

Products used:

Base Coat: Sally Hansen Nail Protex Vitamin-Fortified Strengthener
E.L.F. - Nude
NYC - High Line Green
China Glaze - Shower Together
Top Coat: NYC Grand Central Station

Thanks for reading!
7
comments

Friday, August 30, 2013

Blog Your Heart Out Award!


Hi! I've been nominated for the Blog Your Heart Out Award by The Nail Snail!! Hooray!


I'm going to answer these 5 questions for you, and then recommend 5 bloggers with less than 100 followers so they can gain a little bit of visibility! It was really cool to learn that people actually see my blog and think I'm doing a good job. Being a new blogger can be an odd experience when you're learning how it all works and hoping that people actually see your blog. Getting this award motivates me to keep going! So thank you so much, The Nail Snail!


6
comments

Friday, August 23, 2013

Sally Hansen Cuticle Remover Review

Hi!

I have to admit, while I have always loved polishing my nails, I can't honestly say I've taken care of them. Not that I abuse them or anything, I actually have mild eczema so I've always been pretty good with skincare - but I haven't particularly had a routine for nail care. I would say my biggest issue is cuticle care. Honestly, my cuticles have not been a pretty sight. You can probably tell from pictures I've posted up to a week or two ago. 

I purchased Sally Hansen's Cuticle Remover from Target for $4.99 plus tax. I needed something that would be wallet friendly and still work. 


I wanted to give this a good trial before I made judgments about it, so here's how my experience has been. 
The idea is that you squeeze this gel onto your cuticles, let it sit for a short while (the box says 15 seconds, I gave it 30 seconds) and then scrape off the dead skin with an orange stick. My first experience was a good one - using this did get off a good amount of the excess cuticle - but it wasn't all gone. I was using a soft cuticle pusher that is on the end of my The Body Shop Almond Oil Cuticle Treatment which isn't nearly as solid as a regular old orange stick, so I decided to wait a week and give it another go.

The second time I used it a week later, mostly dry skin came off the sides, but my cuticle is still a little bit not right. However, I used the same "stick", so I honestly think before I try again I'm going to pick up some real orange sticks and that will enable me to really get my cuticles to go away!
Also, note that a little goes a long way, so this bottle will last me a long time.

I encourage you to give it a try, and thanks for reading!
10
comments

Sunday, August 11, 2013

The simplest dotted manicure ever!

Hi!

So sorry that I haven't posted this week - I just started a new job and not only have I been busy, but I've been exhausted! Also, fair warning - this manicure was done and photographed during this tiring week, so the pictures aren't fantastic. Anyway, enough disclaimers!


I started with a base of Sally Hansen - Mint Sorbet (#340). This is my first true mint color - I have a few that come close, but are really more regular greens and teals. This one is a real subtle mint pastel. It looks a little lighter in person, and these pictures were also taken at night. I took these in case it chipped before I got a chance to take daylight pictures, and boy did it chip! Don't worry though, this was due to working, not due to bad polish.


Next I created dots with Color Club - Dreamin'. This is a pretty warm pink color. Over the Mint Sorbet, it looked a bit orangey. I made the dots with a pin, since I lost my dotting tool a few moves ago. I really should grab a new one.

I thought this looked cool, and then my boyfriend commented that it "looks like fungus in a good way". I decided today was just not the week for color choices, I guess.

Thanks for reading!


0
comments

Sunday, August 4, 2013

Pure Ice - Over You

Hi!


I recently saw this polish at Walmart and I couldn't help but pick it up. Over You by Pure Ice is a gorgeous and unique polish - a purple shimmer with light blue/teal glitter. Some of the teal is bar glitter. If you haven't tried Pure Ice polishes I beg you - stop by your local Walmart and give it a go. These polishes have good formulas, unique colors, and they only cost about $2 a pop!!


This is one coat on top of Ulta - Tutu Cute. 

Also, I've read that there are two different "Over You"s, one is like mine, the other is a light blue micro glitter. Odd that they would name two of their polishes the same name when they are so different looking! If I ever spot "Number Two", I'll pick it up and compare them.

Thanks for reading!
4
comments

Monday, July 29, 2013

B.P. by Nordstrom Blue "No Name"

Hi!

Today I wanted to show you one of my favorite blue polishes that I own. It is by B.P. by Nordstrom, a brand from their junior's department. My main issue is that while it does have a name, it is not listed on the bottle. It is one of their older style bottles so it is no longer listed on the website. If I manage to find the name I will update this post... wish me luck.


Sorry for the pre-cleanup, I had worn it as nail art and I didn't clean up until the end.


This is a gorgeous darker blue with a sort of vinyl or matte finish. The formula is smooth and is opaque in two coats. I love B.P. nail polishes because they're good quality and full price they are $5 with free shipping. You can find them in store or at the rack too, and you might find them on sale (this was marked down to $2.49, plus I had my discount at the time). 

Thanks for reading!
0
comments

Saturday, July 27, 2013

Some (awesome) changes!

Hi!

If you've been to my blog before you may notice that it looks completely different. Yesterday I decided Nailsss needed an upgrade and I am about 95% done tweaking it for now. It took a good chunk of time to get right, so please let me know if you like it or if you see anything not functioning as intended. 

I've added some awesome things, such as some pages at the very top where you can read a short "About Nailsss" post, access my full list of every polish I own, and contact me. I'm going to start working today on a list of my most wanted polishes, and once it is completed (for now) I will post it on top as well.


I've also made it easy for you to follow me! You can go up top to follow me via Bloglovin and follow me via Instagram. You can also add me on Google Friend Connect via the sidebar.

Also, you can shoot me an email at nailsss@mail.com with any comments, questions, requests, etc.!

I hope you like the changes (I do!)

Since I had no nail polish for you today, here is a picture of my cat, Flapjack. He claimed that shoebox as soon as the shoes were out of it!


Thanks for reading!

4
comments

Friday, July 26, 2013

No Sponge Gradient (Essie Lilacism and Essie Pop Art Pink)

Hi!

It feels like its been a week since I've posted, but its been more - sorry about that.

Today I have a simple manicure inspired by this post on the Chalkboard Nail blog that illustrates a no sponge gradient manicure! I haven't had the greatest success when trying sponge gradients, so I was super excited to give this a try!

First I applied Essie's Lilacism, a beautiful lilac/lavender color. This polish takes 3 coats for full opacity.


Next, I did 3 coats (and a little extra for touch up) of Essie's Pop Art Pink, and painted less of the nail each coat to create a gradient effect.. I hope that makes sense! I topped it off with Sally Hansen Hard As Wraps.


I love these colors together, I'd been wanting to do something interesting with them for ages. 

If you decide to try this, here are a few things to keep in mind that I learned with this manicure. Make sure you use very thin coats to make the manicure less thick. I would also recommend waiting a few minutes between coats to help with it drying. The top coat makes it look much more seamless! Once I was finished I wasn't happy with the results, but after a top coat - magic!

Unfortunately, once it fully dried, I noticed it got all bubbled up!


Its hard to see here - you can tell mostly on the middle finger, but all of my nails are pretty bubbly. Sadface!

Thanks for reading!

4
comments

Monday, July 1, 2013

Milani #583 Hot Pink over some.. hot pink.

Hi!

I felt like being bright and girly with this manicure. I started with Pure Ice - Flirt Alert. Its an opaque hot pink! I love this one.


After that dried, I did my first coat of Milani #583 Hot Pink.


This is full of hexagon glitters in pink and silver. I found that one coat wouldn't do, and it was a little bit difficult to spread out the glitter.. so for my second "coat", I put the polish on a piece of paper, and transferred the glitters with a toothpick. I topped this off with my NYC clear coat.


I love this glitter, but it is too easy to make a really thick, globby coat of it. Probably will stick to applying the glitters manually in the future!

Thanks for reading!


Copyright © 2010 Nailesque | Premium Blogger Templates & Photography Logos | PSD Design by Amuki